
Installing A Panel Only Grille to be Removable
Using a Panel Only Grille as a Filter Grille in Tight Spaces

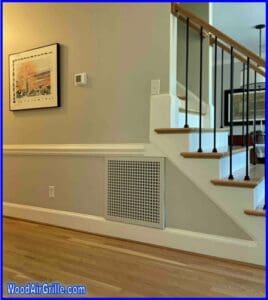
Installing grilles in tight spaces
Sometimes, there are one or more obstructions that prevent you from installing our filter grilles in your home. It may be a door jamb, decorative trim work or a corner that is too close to the opening for our filter grille to fit, at least in its default configuration which would require 2 ¼” clearance around all four sides.
Since our filter housings are made in house, and all our grilles ae built to order, frequently we can reduce the clearance needed to just 1 ½” on one side or two adjacent sides. We accomplish this by offsetting the filter housing on the back. With this modification, it looks and functions just like any other grille and you can only tell it has been modified when you open the door and see the filter is not centered (Fig 1 & 2). Because your grilles are built to order there is no charge for this modification and it does not impact the lead time. You just need to contact us and let us know to make this modification and on which side.
However, sometimes 1 ½” clearance is still not available or there are obstructions on two opposite sides. That is what we are going to address here. This home requires a 20x20 air filter which is sandwiched between the chair rail and the baseboard. There is only 23 ¼” available and the homeowner does not want to cut a notch into the existing trim. (Fig. 3) Given these constraints, our return air filer grille will not work. However, our 22x22 wood return air grille, panel only, will fit nicely on the wall and we will just have to adapt it to accommodate changing the filter.
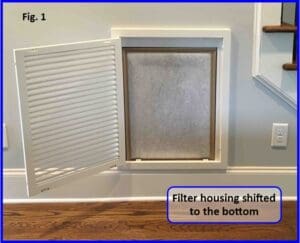
Fig. 1 Filter housing shifted to the bottom
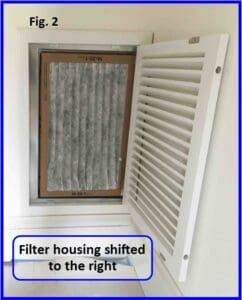
Fig. 2 Filter housing shifted to the right
There are two major elements to accomplish this. First, we will need to create a retainer for the filter and, second, we will need to make the grille removable. We will start by removing the existing metal filter grille. It is a good idea at this point to do some checking and testing to ensure a smooth installation. We test fit the grille by holding it up in the desired location to ensure no additional modifications need to be made. This is also a good indication of whether the wall is flat and the grille will make good contact, but it should also be checked with a straight edge and any high or low spots should be addressed appropriately. There should be framing around all four sides of the plenum box behind the sheetrock, however, checking it with a stud finder is a good idea and will assist you in choosing where to locate your hardware.
The filter housing that comes pre-installed on our filter grilles will have to be replicated in order to keep the filter from being sucked back into the hole making it difficult to change and potentially rendering the system less effective. Essentially, all we need is something to keep it in place. Professional installers commonly use scrap wood, leftover quarter round, or simple metal brackets from the hardware store. On this house we chose to use 1” right angle aluminum stock. It is easy to cut to size and works well with the self-drilling screws we will use to secure it into the metal plenum box. The vertical lip is installed 1” from the face of the sheetrock because we are using a 1” filter. If you are using a 2” or 4” filter, you will want to install the retainer 2” or 4” from the surface of the sheetrock respectively (Fig. 4).
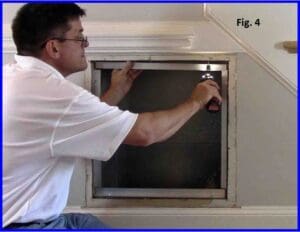
Fig. 2 Filter housing shifted to the right
With the filter retainer in place, we need to install the grille in such a way that it is easily removable for filter changes. Often, installers will use magnetic or roller type cabinet catches which work just fine (Fig. 5). However, in this instance, the frame of the grille fully overlays the wall around the rough opening and we wanted to minimize obstructions to inserting the filter so we chose to recess magnets into the back of the frame. We started by choosing some ¾” round magnets with holes in the center to accommodate countersunk screws paired with 1” strike plates. These items are usually found at your local hardware store or can be readily ordered online (Fig. 6).
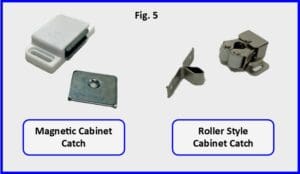
Fig. 5 magnet and roller catches for back of return air grille
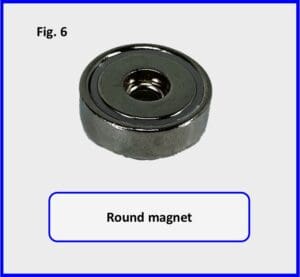
Fig. 6 round magnet for return filter grille
Using a ¾” Forstner bit, we drill a hole in the back of the grille on all 4 corners being careful to match the depth of the hole to the thickness of the magnet. Marking the drill bit with a permanent maker or a piece of tape is a good way to gauge the depth of the hole. If you happen to drill too deep, you can use a washer to raise the magnet until it is level with the back surface of the grille (Fig. 7). We then secure the magnet to the back of the grille using a #6 x 5/8” screw. You could also use epoxy if your magnet doesn’t have a screw hole. This process is repeated on all 4 corners (Fig. 8 & 9).
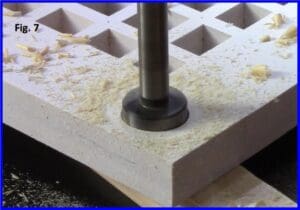
Fig. 7 Drilling hole in back of wood return air grille
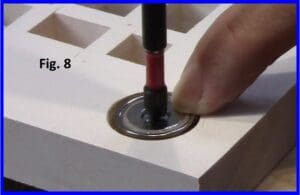
Fig. 8 Single round magnet inset into back of wood return air grille
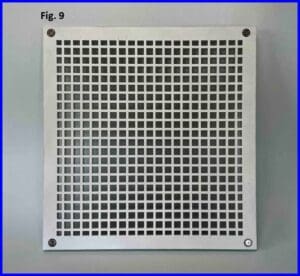
Fig. 9 Wood return egg crate grille with magnets in 4 corners
To give the magnets something to connect with, we attach the 1” strike plates to the wall being carful to measure accurately so the magnets fully connect with the strike plates without being seen peeking out from behind the grille. It is important to disregard the screws that came with the strike plate because they are not long enough. We need screws that will countersink flush into the face of the strike plate and are long enough to extend through the sheetrock into the framing. We used 1 ½” trim head screws which worked well. Alternatively, #4 x 1 ½” wood screws are also a good choice (Fig. 10).
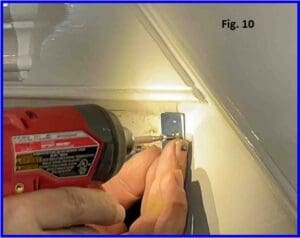
Fig. 10 Installing the stike plates for the wood vent on the wall
All that is left to do is set the filter into the retainer and place the grille on the wall noting the satisfying clicking sound of the magnets contacting the strike plates (Fig. 11). We now have a great looking wood grille and an easy way to regularly change the filter. Writing the date on the filter and setting a reminder on your phone to change it is an excellent practice to ensure the best life and performance of your HVAC system.
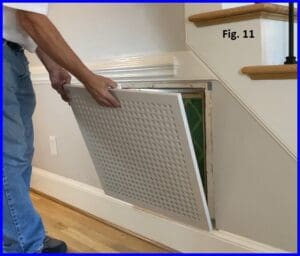
Fig. 11 Snapping the wood return grille into place.